rapitest soil moisture meter Luster Leaf 1810 Rapitest Mini Moisture Tester
SKU: 92212462012
rapitest soil moisture meter

rapitest soil moisture meter Luster Leaf 1810 Rapitest Mini Moisture Tester

Sale price$20.88 Regular price$23.20
Save 10%

Pay in installments of $5.80 with ShopPay, AfterPay and Klarna

Shipping Estimate
USA
  • USA
  • CAN

Ships within 48 hours · Estimated delivery Jul 1 - Jul 6

Promo Codes Available:

For Your Every Summer RSVP, with Code: SUMMER15

Description

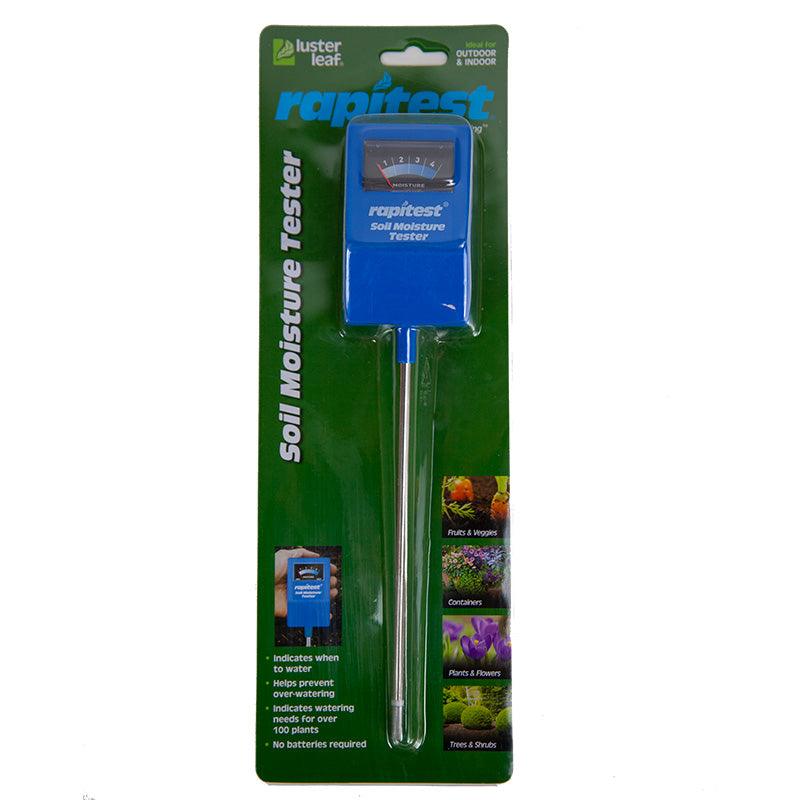
rapitest soil moisture meter Luster Leaf 1810 Rapitest Mini Moisture TesterTester indicates when to water and helps prevent over watering. Press probe 2 3 the depth of planting container and note the reading on the display. Match it to the number on the container and water if number is same or lower than the ideal for the specific plant. Package lists water needs for over 100 plants. No batteries required. For use in soil only not in liquids. RapiTest Mini Soil Moisture Tester: An Essential Tool for Gardeners Gardening

Tester indicates when to water and helps prevent over-watering. Press probe 2/3 the depth of planting container and note the reading on the display. Match it to the number on the container and water if number is same or lower than the ideal for the specific plant.

  • Package lists water needs for over 100 plants.
  • No batteries required.
  • For use in soil only -- not in liquids.

RapiTest Mini Soil Moisture Tester: An Essential Tool for Gardeners

Gardening enthusiasts understand that one of the key factors for successful plant growth is maintaining proper soil moisture levels. Overwatering or underwatering can lead to the demise of even the most robust plants. This is where the RapiTest Mini Soil Moisture Tester comes into play.

Overview

The RapiTest Mini Soil Moisture Tester is a compact and user-friendly device designed to accurately measure the moisture content of your garden soil. This tool is a vital component for gardeners who want to ensure optimal conditions for their plants, whether they are growing flowers, vegetables, or any other type of vegetation.

Key Features

  1. Simple Operation: One of the standout features of the RapiTest Mini Soil Moisture Tester is its ease of use. You don't need to be a seasoned gardener or have a background in horticulture to operate it. Simply insert the probe into the soil, and within seconds, you will get a precise reading of your soil's moisture level.

  2. Dual-Scale Readout: This soil moisture tester offers a dual-scale readout, allowing you to measure soil moisture in both percentage and a scale from 1 to 10. This dual-scale feature makes it suitable for a wide range of plants with varying moisture requirements.

  3. Compact and Portable: The compact size of the RapiTest Mini Soil Moisture Tester makes it easy to carry around your garden. Its portability means you can quickly assess different areas of your garden without hassle.

  4. No Batteries Required: Unlike some soil moisture meters that rely on batteries, this tester operates without the need for any external power source. This makes it a sustainable and low-maintenance tool for your gardening needs.

  5. Durable Construction: Built with durable materials, the RapiTest Mini Soil Moisture Tester is designed to withstand the rigors of outdoor use. It can handle frequent probing and exposure to various weather conditions.

Benefits

  1. Precise Moisture Control: Maintaining the right soil moisture level is crucial for plant health. With the RapiTest Mini Soil Moisture Tester, you can avoid the guesswork and ensure that your plants receive the perfect amount of water they need.

  2. Prevent Overwatering and Underwatering: Overwatering can lead to root rot and other plant diseases, while underwatering can cause wilting and stunted growth. This tester helps you strike the right balance to prevent these issues.

  3. Cost-Efficient: By accurately determining when your soil needs watering, you can save money on water bills and reduce the risk of wasting resources.

  4. Improved Plant Health: When your plants receive the correct amount of moisture, they are more likely to thrive, grow vigorously, and produce beautiful blooms or bountiful harvests.

Usage Tips

To get the most out of your RapiTest Mini Soil Moisture Tester, follow these simple usage tips:

  1. Insert the probe into the soil at various locations within your garden to ensure an accurate representation of moisture levels.

  2. Wait a few moments for the meter to stabilize and provide a reliable reading.

  3. Use the dual-scale readout to interpret the results, adjusting your watering schedule accordingly.

  4. Clean the probe after each use to prevent soil residues from affecting future readings.

The RapiTest Mini Soil Moisture Tester is an indispensable tool for gardeners of all skill levels. Its user-friendly design, dual-scale readout, durability, and cost-efficiency make it a must-have for anyone looking to optimize their gardening efforts and achieve healthier, more vibrant plants. With this tool in your arsenal, you can say goodbye to the guesswork of watering and cultivate a thriving garden with confidence.

Shipping Notes
  • Free Standard Shipping on $100+ Orders to the USA.
  • Except Preorder products are shipped in 48 hours.
  • Delivery to the USA:
  1. Standard Shipping : 3-10 business days
  • If time is of the essence, please consider selecting expedited delivery for faster service.
Exchange/Return Notes
  • We offer a 30-day return/exchange service after receiving.
  • Final sale items are not eligible for returns or exchanges.
  • To process your return/exchange, please contact us at [email protected]
  • Please click here for more details>>> Return & Exchange Policy
SKU: 92212462012

Discover Niche Categories That Outsell rapitest soil moisture meter

Top-Converting Item to Boost Your Average Order

4.5 ★★★★★
Based on 1286 reviews
Sort
Highest Rating
Newest First
Oldest First
Product Reviews
M
Verified Purchase
Mona T.
Boise, US
★★★★★ 5
Attractive
Size: 4 Panel-88'', Color: Grey
The assembled product is just as described. The screens look great! I am using them to hide the cluttered shelving in my garage. The area now looks quite neat Something I must say, though, is that the assembly was extremely difficult. I had to use a silicone spray and some pounding to get the A and B poles to fit together. Also, it required a great deal of strength to stretch and hold the fabric panels so that the bars inserted in each hem lines up with the screws inserted in A/B poles. I strongly recommend having a partner to help with the assembly. while sc and screw into poles them once inserted intetchedtne end of each pole ( and B poles barely fit together. I used silicone spray on the end and then pounded them
WAS THIS REVIEW HELPFUL?YesReportShare
Reviewed in the United States on December 12, 2025
K
Verified Purchase
karine
Houston, US
★★★★★ 5
Works
Size: 3 Panel-102'', Color: Beige, Size: 3 Panel-102'', Color: Beige
It’s beige and not white. Once install - hard to disinstall. Need a drill to put it together
WAS THIS REVIEW HELPFUL?YesReportShare
Reviewed in the United States on May 4, 2026
R
Verified Purchase
ralversity
New York, US
★★★★★ 3
Does the job, but assembling by yourself is a nightmare
Size: 4 Panel-88'', Color: Black
Does it do the job? Yes, although as others said there are small gaps but it's not a huge deal. The price is also good. But the reason I'm giving it a 3/5 is simply because the assembly for this was a complete nightmare. I honestly don't think I would recommend this to anyone unless they have another person to help them assemble it, because doing it by myself was terrible. I don't think I'd buy this again, I think I'd opt to just spend a bit more money and save myself the trouble personally.
WAS THIS REVIEW HELPFUL?YesReportShare
Reviewed in the United States on May 29, 2026
T
Verified Purchase
Talagand
San Leandro, US
★★★★★ 4
Reasonably adequate room divider
Size: 4 Panel-88'', Color: Beige
I'm reviewing this as I assemble it. Couple things: 1. I didn't expect as much assembly. I've ordered dividers before and they more-or-less came as one unit. Sometimes the panels needed screwing together. These require complete assembly and come largely as three rods: two make up vertical columns and snap together. Another one (called part "C") makes the horizontal columns and you have two of these per panel (one attaches to part "A" and the other part "B"). These parts are metal with a plastic shim. Using the wood screws to attach to part "C" is a real pain in the neck. There's not much holding the panel in place so it's a little tricky. One tactic I've found while I'm assembling that works for the initial connections from parts A and B to their respective "C" rods is to hold the screw in place with a screw driver and then rotating the rod around the screw. This will do a number on your hands if you aren't wearing gloves. This obviously doesn't work when completing the connection. Using a driller driver on this is really near impossible because there isn't anything you can use to secure it in place. You can use it on the first panel, but as it gets longer, it becomes increasingly difficult and because it isn't wood, it's really tight. I considered drilling larger pilot holes but since there are only 4x4=16 screws I need to screw in, I just decided to use my screw driver to complete it. 2. Also related to assembly. When completing the panels (attaching parts "A" and "B" to parts "C" that have the cloth cover on it), you have to be careful that when you tighten that side that it isn't loosening the other side. Because the pilot holes are so tight, you can end up rotating the rod, which rotates it in the same direction as looser on the original side. Having someone hold the "C" rod in place while you screw it in is probably the easiest approach. I didn't have a 2nd person, so I just had to keep flipping back and forth and tightening both sides as I screwed it in. Not the worlds biggest deal, but annoying nonetheless. 3. The way the instructions are written, they seem to suggest building this thing progressively; that is, you do panel 1, then 2, connect them together, then do 3 and connect it, etc. I took a different route that I suspect saved me quite a bit of trouble, and I assembled all four panels first and THEN connected everything together. 4. For the love of God make sure you check that the plastic tip is on the same side for every panel. Otherwise, you have to take one side apart again and reverse it. On the bright side, if this happens, you've essentially bored out the pilot holes to be the correct size... which is having me question if I shouldn't have just bored them out to the appropriate width in the first place. 5. Attaching all of the panels together is also an enormous pain in the ass unless you happen to have an 88" long elevated surface. Attaching the legs either requires you to elevate one side, which will invariably twist the inexplicably cheap material in the bottom connectors... or you can attach them sideways... or you can put this thing upright, having two people hold the panels in place while you use the allen wrench to tighten the bolts on the underside. None of those are particularly great options. NOW on to the utility itself. 1. The panels do let some light through (I didn't believe their advertising, and that was one of the reasons that I bought beige, is that I wanted it to not be too dark). They aren't transparent though, so it isn't that far off from their description. They functionally work great, and keep the mess of wires hidden and when I'm sitting at my desk, actually reflect quite a bit of light into my office. Great! 2. My wife has described these as "the most hideous piece of furniture ever conceived of by man." So it does not have spouse approval factor. Granted, she will seldom be in my office area, so that isn't the end of the world. 3. These are really hard to align in a way that doesn't look a little tacky. There are some plastic connectors but they don't do a bang up job of keeping these in place. Each panel is slightly tilted and it's... quite obvious. I may at some point make my own improvements to these to help make them more level. It's not a particularly expensive product so I wasn't expecting much so it's fine and I'm not going to ding them on the rating because of it. All said, would I buy this product again? Probably not. It's assembly was ~90 minutes which is about 75 minutes longer than I was anticipating spending on this (not including the 5 minute writeup that I'm doing here). But am I going to return it? Also no, if for no other reason I'd be just as annoyed taking it apart and putting it in the original box to return it.
WAS THIS REVIEW HELPFUL?YesReportShare
Reviewed in the United States on October 31, 2023
M
Verified Purchase
Martha Jeane
Massapequa, US
★★★★★ 5
Great for using behind me on Zoom calls
Color: Black, Size: 1 Large Panel
This works great as a place to put tapestries behind me when I'm on Zoom calls... much nicer than blurring out the background. Easy to put together, large, works great.
WAS THIS REVIEW HELPFUL?YesReportShare
Reviewed in the United States on April 16, 2026

recommand products